Thursday, October 31, 2013

Fixing the slab and then breaking it ...... $%#!

Raise your hand if you thought tree roots could crack and push a concrete slab up almost an inch.  I certainly did not but that is what happened.  Below is the culprit the concrete guys excavated.  It's not even that big!  Imagine a big root!  OK, that tree needs to go.


Here is an illustration of the cut out portion of the great room.  Pretty big area.

Dowel into existing slab


Finally going to patch up where the plumbing was moved.  I almost let my contractor pour this with bags.  I'm glad I did not since he was not aware that without dowels and mesh even a small area like this could settle and cause issues for my flooring.


OK, so everything above looks great.  But it's about time we had a little screw up.  That column is a point load on which the end of a 14' span LVL sits.  Lots of mass.   Not as easy to see in this picture, but there is a crack to the right of that column.


I put a level on that crack and was not surprised to see that it was 1/2" out of level.  shit.  should have known that would happen since 
(1) I suspected there was not footer on an interior wall
(2) Breaking up the concrete on one side essentially made a concrete peninsula on which the largest interior load sits.  duh.

OK, not time to panic.  Only do that after kids use a sharpie on kitchen cabinets.   After discussions with GC, engineer, concrete guy we will

(1) Put some concrete blocks to the left of the column and then use a jack and some posts to temporarily support the LVL
(2) Use and LVL piece on the other side of the column to span between two posts that will temporarily support that side.
(3) Pull out column
(4) Concrete guys will dig 24" x 24" x 12" deep footing centered under column, per engineer's specs.
(5) Put the column back after concrete cures ...  then we can just use bags at a latter time to pour back the spot where the temporary support is. ....

All sounds great ... should be doing this tomorrow AM so concrete can still be poured on Saturday.  What could possibly go wrong ?

----------------------------------------
Two days later 
----------------------------------------

I am 99% satisfied.  There are two high spots the contractor should have dealt with.  One was a small heave in the slab he left behind that would have been super easy to cut off and  re-pour.  The other high spot is because he poured up to the temporary LVL supports.  I emailed him asking to grind them down before payment so we'll see how that goes ...

After the concrete dried, it is apparent there are some high spots.  The company was good about cutting them out and pouring again. However,  after the 2nd attempt one spot is still a bit high.  I'll have to see what the flooring guy says.  If it works for him it works for me.  Otherwise, I'll have to have the concrete guys back out.  

Saturday, October 26, 2013

Hall Bath Plans

The hall bath is the kids bath, but it will also be the guess bath.  Therefore there need to be design considerations for both.  I really like the idea of using a 12"x24" porcelain tile.  Big tiles mean fewer grout lines to get dirty and porcelain is a very durable product that is easy to clean.  I also think the big tiles look pretty sweet with the right accents.  Leader in the clubhouse shown below.  I'll use the same tile for the floor  laid out in a brick pattern.  I'm thinking an espresso vanity would contrast really nice in here.  Light solid surface counter top and oiled bronze fixtures.


Fireplace Plans

Exterior:

The fireplace is prefab and the siding around it had plenty of weather damage.  That along with a lot of other siding was replaced.  Also had to add a lot flashing that was missing.  There was just gobs of silcone at a long seem.  How there was no water damage is beyond me given that had been there for since the house was built.  The chimney cap needs replaced.  I was quoted $600 by a reputable company but that sounds a bit much to me.  I'll keep looking on that.  A buddy said he got one for $200 and installed himself.  I won't do that but my GC probably wound not charge over $100 to install.

Interior:


The firebox, flue, and interior construction look good.  I'll need to get it cleaned and probably get a new insert. The wood trim around the fireplace is in great shape and has some nice details.  I'm going to try and save it.   I'll put some faux stone around the base and then some sort of tile on the hearth and border.  Basically cover up all the brick.


Leading candidate for faux stone.  Not sure yet but may want something with a little less tones.

Friday, October 25, 2013

Changing the Footprint

My dad made a good request to put a sketch up for some perspective.   This sketch is not quite to scale .. but it is not too far off either.  Two open items illustrated on the sketch are:


  •  (A) a possible new exterior door.   The reasoning here is that it is that we may not want the sunroom to be a traffic area.  Also, there will be a patio behind that utility room and the kitchen ... and probably be the place for the grill.  
  •  (B) possibly open the wall between kitchen extension and sunroom.  I'm on the fence about this but I'm leaning to a yes.  The reason here is that wall space is not as critical.  This room is wide enough that a couch and table can be offset off the wall without interrupting traffic.  At the least I will need a column at the corner to support the load of the exterior wall.... so it can't be 100% open.


Thursday, October 24, 2013

Master Bathroom Ideas

Insipration Done.  But you know what really grinds my gears?  I need to pick out a rough in valve to finish the rough plumbing.  I'm shopping around and am finding that a $200-$300 shower kit that looks nice that is supposed to be "brushed nickel" is actually  made of mostly PLASTIC!  Check it out for yourself ... Delta In2ition shower kit at home depot ... $219 ... freaking plastic.  And that is what really grinds my gears.


To keep Miceli contracting on the move we decided to have them do all the tile work.  Great!  The only problem was that I needed the tile right away and special order would just not cut it.  That being said the tile I needed to get for the master was a shade darker than I wanted ... but it will look great once we get light and other finishings into the room ...

Sammy and Nelson cutting tile for the master bath while Patrick yells for the next tile.

Master shower under construction


Note the tile is much more gray than the inspiration pictures.  In fact, this tile actually matches the countertop in the inspiration.  The floors are carrerra white marble which has grey veins in it.  The vanity is a pure white shaker style.  The paint is Sherwin Williams Ancient Marble.  That is the light greyish/green that Roddy really liked.

I need to pick out the vanity top and the shower seat.  Of course, the shower seat stone are the pieces that are fabricated for the entry into the shower and the tops of the knee walls that the glass enclosure will sit on.

Already installed:

Grey subway tile surround
white shaker vanity
white carrerra marble floors

Need to select:

Vanity top
Shower seat
Backsplash

Option 1:

Light grey vanity top, white subway tile back splash, and white quartz shower seat.

My main concern here is too much going on.  I can't use the light grey for the seat and backsplash because fabricator does not have enough.


Option 2:

Some combination of the above, but just use a DARK gray quartz that matches the shower subway tile (see pic below). The fabricator has enough dark gray quartz that I can use the same product for the backspash, top, and shower seat if I want to.  My main concern here is that the dark gray top does not match the tile exactly, but the slight contrast looks awkward.   Also, that it is too dark.


Option 3) Others?

Monday, October 21, 2013

Kitchen

Initial kitchen layout.  

Probably will do a microwave above cooktop.   Going with cooktop because I'm sick of nasty grease, taco meat, baked beans, marinara sauce, etc. that always finds its way between countertop and range.

New peninsula will look out into open sunroom and extended kitchen area.  Area will be flooded with light.  The wall oven on the right will go in the space occupied by the original hallway.
 Pantry next to wall oven.  Pantry will be pretty deep.  We are taking 6" away from powder room width which should give us about 2' deep shelving.  Opening leads to dining room.    Once design consideration are the wall cabinets.  Current design has a filler strip and crown moulding that goes all the way to ceiling.  I'm not sure if I want all cabinets to hit the ceiling for asthetic reasons.

Sunroom and kitchen extension

Sunroom will have same footprint as screened in porch.  All windows but with 8' sliding patio door that leads out onto the deck.  To the right is the current kithen bay window.  That will be blown and moved back 3'. 


Here is the design for sunroom and kitchen.  Need 14  windows.   30' x 54.5' R.O.    and one really big sliding patio door.


Here is the window.  Anderson 100 series with dark bronze exterior/white interior.  Made of maintenance free composite material.  It has a cleaner look than vynil because there are no weld seams.  No grates.  Low E glass.   Buidling supply wanted $270 per window.  HD wanted $220 per window.  Went to HD to order and found out Anderson was having 15% off all special order windows.  Yes please.  Saved about $700 off windows and patio door.    +1 beer for HD associate.


Temporary bracing in place so that footings and slab can be poured for sunroom.   The perimeter of the existing patio will be torn up so that footings can be poured.  Concerete will also be poured to bring slab to same level as main living area.   Work should begin Monday.

Concerete contractor said 8" deep and 15" wide footings are good enough.  I consulted my engineer and he wants em 12" deep.  I have heard many varying accounts on what footers should be.  I'll need to consult the building codes to see for myself.   Rebar will also be tied and doweled into existing slab.   I have never poured concrete before ...  makes me a little nervous.

The first real frustration to log:   Argghhh!!!   I finally had a concrete contractor lined up to start tomorrow AM. I found him on homeadvisor.com which is supposed to pre-screen their pros for applicable licenses, etc.  I texted this guy 6PM Sunday night asking him to bring proof of insurance.  Turns out he does not have any.  See that structure in the picture above .... It would not be a good idea to let someone cut out big chunks of concrete under that thing without their own liability insurance.  Just FYI:  Homeowners does NOT cover an incident where someone is hired as an independent contractor.

The real pain in the ass here is that I have already had 5 guys come look at this job ...  including the guy with no insurance.   Two of them came out to look ... and then would not even return my phone calls requesting a price. One guys came out to look and then said he was too busy, and the last guys charged me $600 over what I wanted ($4K).  That extra $600 does not sound too bad right now.


...........


I sure am glad I switched companies ... these guys have ran into thick concrete, tree roots, etc... and they did not complain or ask for more money.  They just did the job.  The prep included breaking up the old patio on the perimeter while digging minimum 16" deep and 16" wide footings.  A little extra because code only requires 12" deep or 8" below ground level (below frost line).


  Two strands of rebard tied around perimeter and into existing slab.


  6mm poly film and wiremesh on top.  Engineer likes it. I like it.  Sweet.


----------------
Two days later ...
----------------

Slab looks good to me :)


Miceli contracting is in town so it's time to get some real work done.


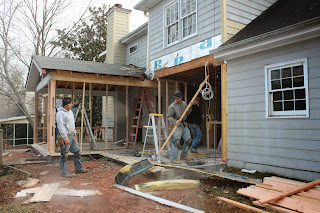
Three pictures above were taken about the end of day one.  Kitchen wall removed and most of the permanenant structural support has been added for extension.

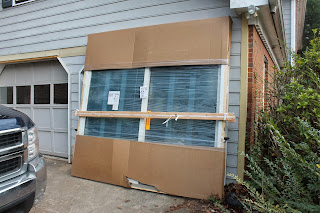
The windows and sliding glass door were also delivered on day one.  The door is ummmm.... the wrong size.  Like freaking huge.  S#%!.    No time to do another special order ....  I'll have to pick a door off the shelf at HD.

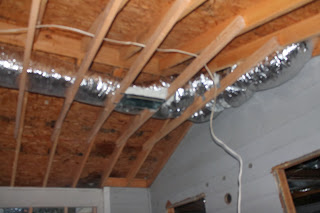
By the end of day 1, the HVAC ducts were also ran to the extension.  HVAC guy tied a 10" line into air handler, down an upstairs closet, and into the top of the extension as showed in the top right of the picture below.  There were no manual D calculations done and that certainly worries me.  The project was just moving too fast and I dropped the ball on that one.  Hopefully the duct design flaws can be cured when we install new HVAC.


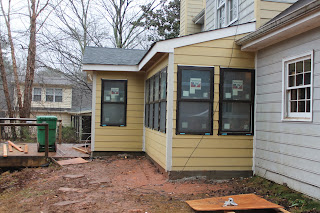
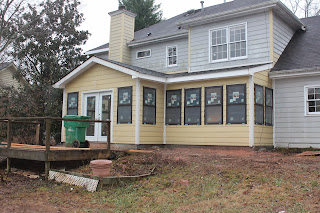
Skip ahead to day 4 and the building is now water tight.  Framing, windows, flashing, siding, roof, and exterior trim is all complete.   Patrick and the guys really blew through this addition while making it look great.

Note the white french doors.  Since the special order was screwed up I had to pull a door of the shelf and will have to paint to match.  This is also my first real screw up.  That door should be a slider instead of french doors.  Can't put chairs right inside the doors because they open into the room :(  


After passing HVAC, electical, and framing inspections all in one week we were given the go ahead to close our walls.  We did intially fail HVAC and electrical for nit pick type items.  The framing inspector also turned out to be from NY ... and because he knew Patrick was from NY he made sure some balls were busted before passing us.


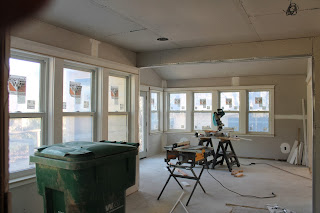
Fast forward a few more days and the boys had the entire house insulated, drywalled, and mostly trimmed out.  We did insulation around all bathrooms for privacy and below the master bedroom for peace and quiet.


View coming into new kitchen sitting area from garage:

Coming into kitchen from dining room

View from middle of kitchen into kitchen sitting area and sunroom.

View into living room from sunroom.

After 13 strait days of 8-10 hour days it was time for Patrick, Sammy, Nelson, and William to leave.  Great job guys!


Move the plumbing

Ok, so why do all of this?   This viewpoint is from the kitchen.  Through the studs is the family room and to the left of that half bathroom is the future sunroon.  The plumbing wall needs to be opened to tie the whole space together.

A slightly different view in the kitchen shows the plumbing wall on the left.  That will be open.  The current hallway (to the right of the plumbing wall) will be a rough out for a wall oven cabinet.    Further to the right is a patry, which will remain.  Not viewable in this picture, but the new powder room will take up half the pantry and half of the current hallway.

To be fair, there is a LOT of plumbing work to be done.   However, the first quote of $8500 is laughable.  Expect to pay a qualified plumber about $100 per hour.  That means this company basically said it would take 85 hours to complete the job.  A big problem is that most plumbers treat a slab job like attempting to access oil under 2 miles of ocean and 1 mile of bedrock.  It's just 4" of concrete and some dirt!  


The solution of course is just to have a concrete cutter open up the slab for $400,... and then have the plumber do plumbing.   Some plumbers reject this plan because they claim if someone else cuts the concrete and does not cut enough ... the plumber will have pack up all of their tools and then come back again ... and that will cost me more money than just having the plumber do all the concrete.  bullshit.   

I found a plumber I liked.  He said that concrete guys should do concrete and plumbers should do plumbing.  $2400 .  Good references.  You're hired. 


Here are some pictures after the cutting.  Plumber had previously marked where he thought slab needed to be cut.  Basically, all of that plumbing coming into slab needs to go into slab though the wall on the right.   Also, because I am moving the powder room we will need to tie into the existing drain line.


A slightly different view.  The plumbing needs to come down the wall that is 90 degrees to the existing plumbing wall (shown at left of photo).


Looking into the hole one can see the black drain line.  It's down about 1 ft which is perfect because the pipe from the new toilet and vanity location will need fall.  In between the concrete and black pipe you wil notice the 3" tree root.  The bath is at the BACK of the house.  That root is coming from the FRONT of the house.   More on that later :o

Looking to the back of the new powder room where the new throne will go.


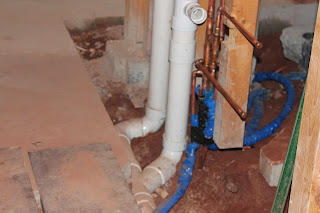
Now from above.  New drain pipes are all white.   I guess it will be hard for anyone to deny what is new!  Both drains from upstairs baths now turn instead of going down.  The old drain line on the far left will be removed.    Water lines will follow the same route.  Vent stack will follow a sligtly different route ... but same basic principle.
 In the living room now under hall bath.  Most of that stays the same.  The white pipe is from the master toilet... which had to be moved to make way for my massivly manly glass enclosure shower.  To move it though meant we had to tie in to the main drain pipe further down.  Can't tie in toilet drains before vanity drains.  There are good reasons for that.
 Finally, this is directly under the master bath.   The white pipe terminates where the new toilet will be.  Had to move yet another HVAC duct.  On the right you can see a new hole for the stand up shower.


Fast forward one day later and the job is complete!


Coupling with brazzed joints required by code

                                        New drain and water lines with rough out for new vanity.

                                                               Tie in to existing sewer line

                                                       Another view of all lines coming down

And looking up ....

                                          All that and for what?  The plumbing no longer comes
                                          down the center wall!

                                         And master bath drains are located in appropriate spots!

Plumbing rough inspection has passed!  Won't need to worry about pipes again until fixtures installation.