Infrastructure is done! Time to close it up an make this look like a house again. $3500 quote was disappointing when I first heard it. I knew it would be about $2K to do the entire downstairs celings. What I really forgot to budget for was the kitchens and bathrooms. All walls needed removal just because of all the plumibing and electrical that needed moved. Further, there is the master closet, the pantry, new powder room, and tons of patch work. It adds up now, I just forgot a some stuff on my original budget. I'm probably at about $1.80 per square foot which is a solid price.
After the extension there was even more drywall work that probably would have pushed the total bid to around 5K. Patrick and the guys spent around 2.5 days total to hang drywall the entire house. That way they could work on the extensive amount of mill work. I subsequently got a bid of $2600 to do all of the finish work.... which is about where I expected. There must have been about 8 guys doing the first coat of mud Saturday AM. They were like aunts ... everywhere!
Thursday, November 21, 2013

Tree Work
Now that I understand that tree roots beat concrete:
Before. Those trees are ugly anyway with all the ivy climbing up.

Before. Those trees are ugly anyway with all the ivy climbing up.

stipple ceilings
Like most of the population, I despise textured ceilings. Of all the dirty ways builders find to save money I think this is the one that grinds my gears the most. The savings was minimal but the remediation is painful. Besides being unsightly, these ceilings collect dirt, dust, grease, and darken rooms by casting thousands of tiny shadows.
The downstairs remedy was easy. Remove the ceilings and redo. That decision was easy because most of the ceiling needed exposure given the all the recessed lights, plumbing, HVAC, and framing work that needed done. The upstairs is a different story because (1) there is minimal infrastructure in the ceilings and (2) all that insulation is resting on the ceilings. Leaving them is not an option ....
Option 1: Drywall over the existing ceilings. I don't like that option because you lose headroom and it cost about the same as paying someone to scrape, skim coast, and sand the ceilings.
Option 2: Pay a company $2 a square foot to remedy. eh ... $2800 not really in the budget
Option 3: Trying sanding the ceilings myself.
Rent a pole sander from HD. Comes with a hose so you can sync it up with wet/dry vac. Sweet

The enemy.
 So gross ....


The downstairs remedy was easy. Remove the ceilings and redo. That decision was easy because most of the ceiling needed exposure given the all the recessed lights, plumbing, HVAC, and framing work that needed done. The upstairs is a different story because (1) there is minimal infrastructure in the ceilings and (2) all that insulation is resting on the ceilings. Leaving them is not an option ....
Option 1: Drywall over the existing ceilings. I don't like that option because you lose headroom and it cost about the same as paying someone to scrape, skim coast, and sand the ceilings.
Option 2: Pay a company $2 a square foot to remedy. eh ... $2800 not really in the budget
Option 3: Trying sanding the ceilings myself.
Rent a pole sander from HD. Comes with a hose so you can sync it up with wet/dry vac. Sweet


The sander worked pretty well ...until I broke the sander. It kept the dust down since I hooked the hose up to the dryvac. The problem is that I tried to go too fast. The tool is made in China and it has plastic pieces. Duh
Attempt 2: Orbital Sander ... Besides being way too slow because it's ... smaller, there is no way to control the dust. I think I almost choked myself. The picture below was taken 20 minutes after I was done sanding. The camera flash exposed all of the dust!

Attempt 3: Wet and then scrape off the stipple. I did a whole room in three dirty hours (see below)

However, as the scraping only removes most of the stipple. I still need to sand the ceilings and probably skim coat because with all the scraping I damaged some of the drywall paper.

Attempt 1 seems to be the best way. Time to go back to HD and rent a pole sander under a different name.
Tuesday, November 5, 2013
Electrical
The difference between an electrical engineer and an electrician could not have been more evident than today.... I never heard the phrase ... you can't do that it's against code ... so many times in my life. Details to come ...
$4K to $6K is the quote. I should have figured because after going through the house with electrician I could see nothing but $$$. The plan calls for 30 recessed lights, almost a complete rewire of the downstairs to accommodate the new floor plan and modified kitchen, the sun-room addition, all receptacles and switches replaced, new GFCI circuits for baths and kitchen, re-routing of cable, phone, and HDMI lines, countless fixtures, fart fans, etc. etc. etc.
----------------------------------------------------------------------------------------------
To cut costs, I scaled back the number of recessed lights, fans, and HVAC service upgrades (which are not required anyway). After some further diagnostics the electrician agreed to do it for 4K which "sounds" good. It only sounds like good news because it was at the low limit of his bid. I really screwed up the budget for this one by about $2K.
----------------------------------------------------------------------------------------------
First real frustration of the job. The electrician said he would be done Friday after I gave him for the draw for the work done. Well, he stopped answering my calls and would not return messages. Never a good sign. Then, I called him with another phone and he picked up. What is this? Freaking high school? Says he will be done with rough in on Monday and that he just got busy. Hmmmmm....
Ordinarily, this is grounds for dismissal. However, given he is in the middle of the job I need to make an effort to keep the peace to get what I want. I want the rough in done NOW so this job is not held up. No electrical = no drywall = no tile, etc. A few more days though and I'll have to start looking elsewhere. That would be a pain in the ass!
------------------------------------------------------------------------------------------------
LED? LED lights are bad ass. Better light, low heat, great energy efficiency, etc. Freaking expensive though. I did find some commercial electric (HD brand) recessed trim lights for $20 each. In case you don't know, a price that low is unprecedented. Still, with twenty three cans I'm looking at $460. Compare that to $8 each for a basic trim kit and halogen light ($184). I calculated I'll save about $100 per year on lighting costs so it's only a three year payback. Combine that with a light that last longer than your cat and I think it starts to look like a good investment. Plus they are cool!
http://www.homedepot.com/p/Commercial-Electric-6-in-Recessed-White-LED-Trim-CER6730WH/203489880#.UomEU8RONLk
$4K to $6K is the quote. I should have figured because after going through the house with electrician I could see nothing but $$$. The plan calls for 30 recessed lights, almost a complete rewire of the downstairs to accommodate the new floor plan and modified kitchen, the sun-room addition, all receptacles and switches replaced, new GFCI circuits for baths and kitchen, re-routing of cable, phone, and HDMI lines, countless fixtures, fart fans, etc. etc. etc.
----------------------------------------------------------------------------------------------
To cut costs, I scaled back the number of recessed lights, fans, and HVAC service upgrades (which are not required anyway). After some further diagnostics the electrician agreed to do it for 4K which "sounds" good. It only sounds like good news because it was at the low limit of his bid. I really screwed up the budget for this one by about $2K.
----------------------------------------------------------------------------------------------
First real frustration of the job. The electrician said he would be done Friday after I gave him for the draw for the work done. Well, he stopped answering my calls and would not return messages. Never a good sign. Then, I called him with another phone and he picked up. What is this? Freaking high school? Says he will be done with rough in on Monday and that he just got busy. Hmmmmm....
Ordinarily, this is grounds for dismissal. However, given he is in the middle of the job I need to make an effort to keep the peace to get what I want. I want the rough in done NOW so this job is not held up. No electrical = no drywall = no tile, etc. A few more days though and I'll have to start looking elsewhere. That would be a pain in the ass!
------------------------------------------------------------------------------------------------
LED? LED lights are bad ass. Better light, low heat, great energy efficiency, etc. Freaking expensive though. I did find some commercial electric (HD brand) recessed trim lights for $20 each. In case you don't know, a price that low is unprecedented. Still, with twenty three cans I'm looking at $460. Compare that to $8 each for a basic trim kit and halogen light ($184). I calculated I'll save about $100 per year on lighting costs so it's only a three year payback. Combine that with a light that last longer than your cat and I think it starts to look like a good investment. Plus they are cool!
http://www.homedepot.com/p/Commercial-Electric-6-in-Recessed-White-LED-Trim-CER6730WH/203489880#.UomEU8RONLk
HVAC
Got a quote for $800 to re-locate 3 supplies and 3 returns. Took it right away as the contractor could start the next day and I knew that was about the right number. This was the easy part .... The hard part is going to be (1) getting ducts to the sunroom when it's built and (2) deciding when to spring for a new system..... I'm very reluctant to spend anything on these old systems ... but what if they last 5 or 10 more years ??? It's a hard tradeoff. It looks like a pair of 16 SEER units will cost me about $8K. Better than I thought ..
Move a wall? Move a duct. Master bedroom closet.
 Return on lower floor. Technician had to fabricate box due to non-standard placement.


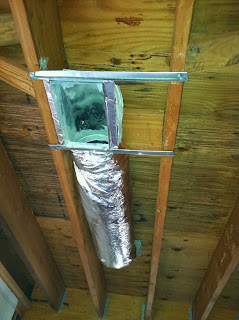
Move a wall? Move a duct. Master bedroom closet.


Thursday, October 31, 2013
Fixing the slab and then breaking it ...... $%#!
Raise your hand if you thought tree roots could crack and push a concrete slab up almost an inch. I certainly did not but that is what happened. Below is the culprit the concrete guys excavated. It's not even that big! Imagine a big root! OK, that tree needs to go.

Here is an illustration of the cut out portion of the great room. Pretty big area.

Dowel into existing slab

Finally going to patch up where the plumbing was moved. I almost let my contractor pour this with bags. I'm glad I did not since he was not aware that without dowels and mesh even a small area like this could settle and cause issues for my flooring.


OK, so everything above looks great. But it's about time we had a little screw up. That column is a point load on which the end of a 14' span LVL sits. Lots of mass. Not as easy to see in this picture, but there is a crack to the right of that column.


Here is an illustration of the cut out portion of the great room. Pretty big area.

Dowel into existing slab

Finally going to patch up where the plumbing was moved. I almost let my contractor pour this with bags. I'm glad I did not since he was not aware that without dowels and mesh even a small area like this could settle and cause issues for my flooring.


OK, so everything above looks great. But it's about time we had a little screw up. That column is a point load on which the end of a 14' span LVL sits. Lots of mass. Not as easy to see in this picture, but there is a crack to the right of that column.


I put a level on that crack and was not surprised to see that it was 1/2" out of level. shit. should have known that would happen since
(1) I suspected there was not footer on an interior wall
(2) Breaking up the concrete on one side essentially made a concrete peninsula on which the largest interior load sits. duh.
OK, not time to panic. Only do that after kids use a sharpie on kitchen cabinets. After discussions with GC, engineer, concrete guy we will
(1) Put some concrete blocks to the left of the column and then use a jack and some posts to temporarily support the LVL
(2) Use and LVL piece on the other side of the column to span between two posts that will temporarily support that side.
(3) Pull out column
(4) Concrete guys will dig 24" x 24" x 12" deep footing centered under column, per engineer's specs.
(5) Put the column back after concrete cures ... then we can just use bags at a latter time to pour back the spot where the temporary support is. ....
All sounds great ... should be doing this tomorrow AM so concrete can still be poured on Saturday. What could possibly go wrong ?
----------------------------------------
Two days later
----------------------------------------
I am 99% satisfied. There are two high spots the contractor should have dealt with. One was a small heave in the slab he left behind that would have been super easy to cut off and re-pour. The other high spot is because he poured up to the temporary LVL supports. I emailed him asking to grind them down before payment so we'll see how that goes ...


After the concrete dried, it is apparent there are some high spots. The company was good about cutting them out and pouring again. However, after the 2nd attempt one spot is still a bit high. I'll have to see what the flooring guy says. If it works for him it works for me. Otherwise, I'll have to have the concrete guys back out.
Saturday, October 26, 2013
Hall Bath Plans
The hall bath is the kids bath, but it will also be the guess bath. Therefore there need to be design considerations for both. I really like the idea of using a 12"x24" porcelain tile. Big tiles mean fewer grout lines to get dirty and porcelain is a very durable product that is easy to clean. I also think the big tiles look pretty sweet with the right accents. Leader in the clubhouse shown below. I'll use the same tile for the floor laid out in a brick pattern. I'm thinking an espresso vanity would contrast really nice in here. Light solid surface counter top and oiled bronze fixtures.
.jpeg)
Subscribe to:
Posts (Atom)